Overview

The purpose of this blog is to inspire people to create. I'm a Pinterest addict, there isn't a day that goes by that I'm not searching for my next project. There are so many talented people out there posting awesome creations that I thought I could join in the inspiration and help others be distinctively creative.A little history on myself: I ran a home based craft business for about 6 years. At the time I sold my products to almost every US state, and countries like Japan and Iceland. One of my designs "Tulips in Spring" was published in the "Let's Paint Magazine" by Decoart and is still available online. I have taught adult education classes at several of my surrounding community colleges and high schools. I was a Girl Scout Leader for 13 years and love coming up with different weekly crafts/swaps. Currently a couple times a year I get my "craft fix" by supplying a craft at girls night/weekend, but now I would like to share my distinctive creations with you.

Thursday, April 4, 2013

Kaleb's Cakes


Kaleb's 28th Birthday Cake

By the time Kaleb's Birthday came around this year I was very into cake pops. I wanted to create them in every size and shape. So, since Kaleb is a pilot I decided to create an airplane cake pops flying around a cake painted with clouds. The cake is covered with buttercream frosting and them painted with clear vanilla extract and food coloring. I used my cake decorating paint brushes.

Each chocolate airplane has something on the wings, such as: 28 or Kaleb
 

Kaleb's 29th Birthday Cake

This cake was made with Milk Chocolate Cake and Raspberry filling.  It was covered with chocolate frosting and garnished with fresh raspberries and whipcream.
 

Duckie Baby Shower Cakes


A colleague at work ask me to make cupcakes for a baby shower and I found some inspiration online here.

Marjie helped me make all the ducks out of fondant then we frosted with light blue butter cream frosting and sprinkled with light blue edible sugar peals to represent the bubbles in the "bath water" (frosting) of these cupcakes.

The top cake was a made from scratch carrot cake with cream cheese frosting tinted light blue and piped on to look like water waves. The duck on the top is an actual rubber duck - not fondant!
This was a very fun project and I loved how the ducks all look when packaged together. They look like they are swimming together in a bubble filled tub!

Debbie's 58th Chocolate Raspberry Birthday Cake


Adding fillings is another thing I experimented with, for Debbie's Birthday Cake I baked a Milk Chocolate cake, created a "damn" between the layers of cake with chocolate fudge frosting, then heated a jar of seedless raspberry jam in the microwave until it could be poured into my "pond" that was created on the first layer with the damn of chocolate frosting. I frosted the outside with white buttercream and decorated with fresh raspberries and dark modeling chocolate roses and a big "58" for the top.


Happy Birthday!
(Debbie with Granddaughter Mia)
 

Annie's White Chocolate Raspberry Birthday Cake


....and then I discovered modeling chocolate LOVE IT!! and again it is SO easy! Melt some chocolate and add corn syrup and you have another medium to create practically anything. You can make it in dark, milk or white chocolate, whatever you prefer or that goes with your theme. I used dark chocolate to make roses and leaf cutouts for Annie's White Chocolate Raspberry cake - it was Delicious!!

After getting the cake super cold I was able to wrap it like a gift to give to her.

Marjie's Graduation Cake


Marjie created a drawing of what she wanted on her cake months before her graduation party.

I baked one White Almond Sour Cream Wedding cake exactly like the recipe and another one using the same recipe except using a chocolate cake mix instead of the white, then we alternated the layers so that each cake had a layer of chocolate and white.
We crumb coated each cake using white buttercream frosting shown below:
Then each cake was covered with white Fondant

We colored the remaining fondant Blue (High School Color) and Green (College Color) and cut out letters and circles to decorate cake. Yes my kitchen table was a mess - I'm not a neat baker!!


We used a paint brush and brushed on corn syrup on the back of each shape and letter to stick onto the cake.

Marjie used a red food color marker to add softball threads to cake topper.

The cake topper is made out of cake wrapped in yellow fondant and then topped with a blue graduation cap. The tassel was created by pressing fondant through a pasta maker, half white and half blue to look like the real one.
The diploma sitting next to the ball is also made from rolled fondant


There is a Bat and Home Plate placed between the layers and little balls of fondant are placed around each cake bottom.
Ta-Da!! The completed cake - not bad for our first multi-layer cake!!

Fondant Roses


The roses can be made with modeling chocolate or fondant and are fairly easy to make. I start with a cone shaped piece of fondant on my work surface with the fat side of the cone attached to the table, then I cut out circles with my cutter and wrap them around the cone while curling the petal out. I was too cheap to buy all the tools that are involved in making roses but this example by another blogger is a good example on how to make them. The awesome thing about making flowers is that each one can be different and no two exactly alike. You can sprinkle them with sugar or edible glitter, tint them red or any color of the rainbow.


I Love to Bake Cakes

Birthday, Holiday, Anniversary or Just For Fun, I love them all and when I discovered I could make my own Fondant out of Marshmallows, I was hooked!! I think it tastes so much better than anything you can buy and it is so easy to make.  I use my kitchen aide mixer and it is a snap.  Be sure to ONLY use C&H pure powdered sugar because it works.  I tried to make it with an off brand and it flopped big time.  Fondant provides the opportunity to be so creative and it can be used in so many ways and on everything!  I have tinted it and cut it out with cookie cutters, painted it with fish and shaped it into daisies and roses.

                    Flower Pot Cakes


These flower pot cakes were my first cakes using fondant and was made just for fun because I was inspired by a cake I saw online (of course mine does not look like the professional - but I still like them)  I used a dark chocolate cake (to represent the dirt) and  chocolate buttercream frosting to keep the fondant attached. 


Thursday, March 21, 2013

Spring Spruce Up - Recover Dingy Lawn Chair Cushions

   Before and After

 
I'm not a professional seamstress, I can't even sew a straight line.  If you can measure and do some minor calculations you can complete this project. 

I wonder how many lawn cushions just like these get thrown away all the time?  My husband found a great deal on a couple of wrought iron table and chairs last fall.  They came with these cushions that have see better days.  I power washed them twice and let them dry in the sun.  Since Spring is fast approaching I needed to get them covered ASAP!.

Calculate How Much Material

I measured them and calculated how much material I needed.  I determined that each cushion would need 39 inches of length.  (measure how long the cushion is and multiply by 6 (39x6=234inches then divide by 36 to figure how many yards 234/36=6.5)

I visited my local Joann's Fabric and Crafts Store and picked up an outdoor stripped yellow, grey and black fabric (my husband's favorite colors) and some Velcro. I used my 40% coupon, so I'm able to recover 6 chairs for only $11 each.

Supply List:

  1. 6.5 Yards of Outdoor Material
  2. Thread 
  3. Scissors
  4. Pins
  5. Velcro
  6. Sewing Machine
  7. Straight Edge (if you can't sew or cut a straight line like me)
  8. Basic basic sewing knowledge
 

Cut Material to Legnth

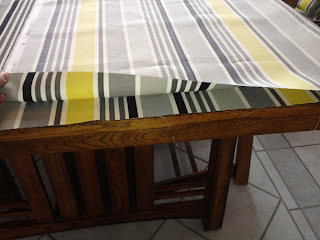
Lay material out flat exactly how it comes off the bolt (folded in half) and measure out 6 - 39 inch pieces and cut
 

Determine Side Seams

Lay out cushion on material to determine side seams

Align Pattern


Pin Right Sides Together and Align Stripes


Draw Seam Line on Top


Since I can't cut a straight line I line up a straight edge on one of the stripes and draw it in with a pencil.

 Take it to the Machine

Sew up only three sides and reinforce the corners by double stitching
 
Use pencil line to sew straight line on the top

Test the fit and make adjustments if needed


If it fits - Trim off both sides

(If it doesn't then turn it back around and sew it up tighter)
 
Trun it right side out and top stitch all three sides


Make Staps

Use the folded side to make the Velcro straps that will hold the cushions to the chairs.

Take the folded side that you just trimmed off back to the sewing machine
Sew up the folded side at appoximately 1.5 inch width
Trim off excess material
 Cut four 8.5 inch sections

Turn each section right side out
Turn right side out
 
Tuck ends in
Cut Velcro in 1.5 inch strips (same width of straps)
Top stitch all straps and sew on velcro

Strap Placement on cover

Place the straps on the same side of the cover and sew

Sew on Straps

Back stitch several times for added strength
Stitch only an inch on the side straps

Cover the cushion

Turn the edges under and sew

ENJOY!!